Getting Started
Installation
- Unzip the MKAnimPicker folder
- Copy it into your Houdini preferences directory or in a directory of your choice:
- Open the
MK_AnimPicker.jsonpackage file and verify the paths match your installation location. If you placed the folder somewhere else, update the paths accordingly. - Restart Houdini.
Opening the Panel
Create a new pane tab and search for MK_APEX_Anim_Picker in the panel list.
The panel can be docked anywhere in your Houdini layout like any other pane.
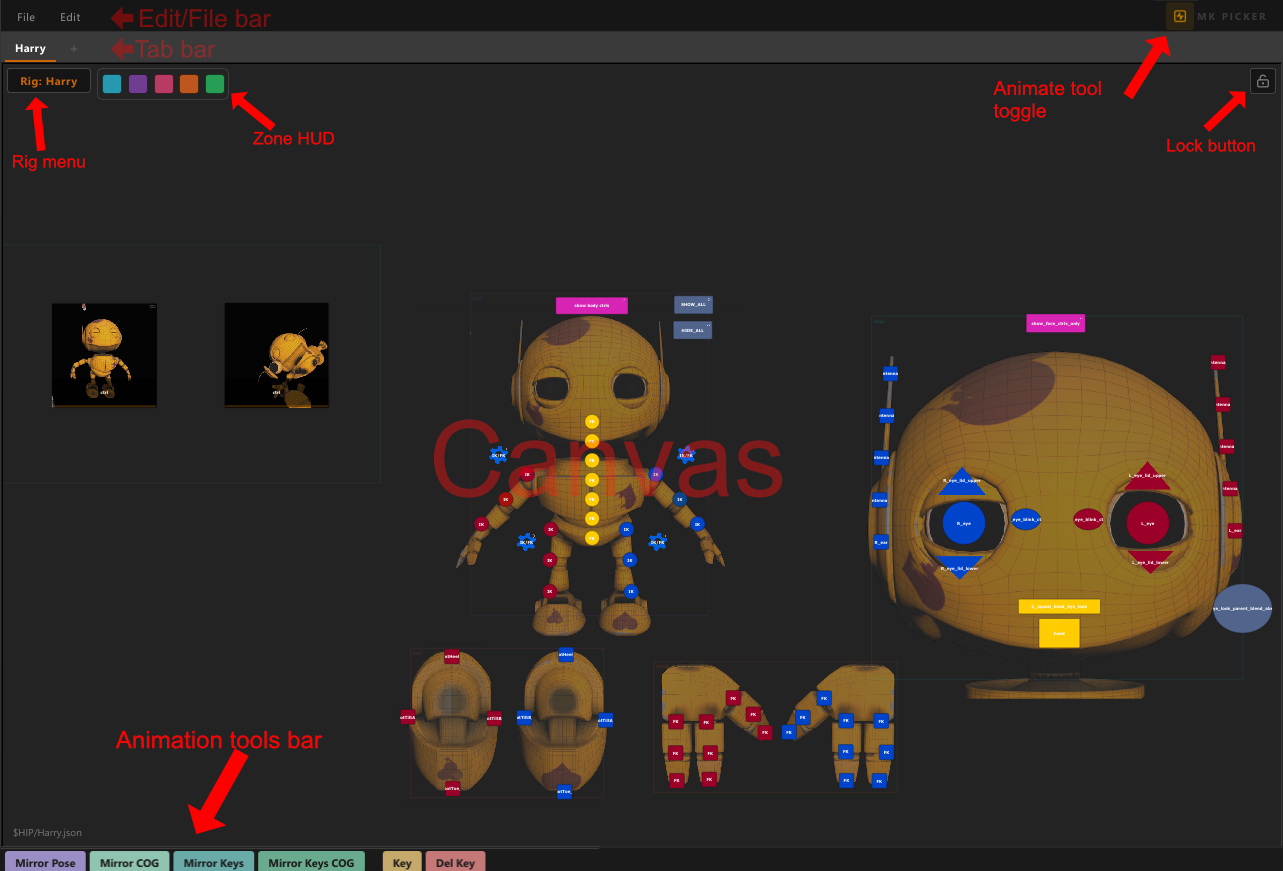
Interface Overview
| Area | Description |
|---|---|
| Edit/File bar | Toolbar row with zone controls, edit mode toggle, save/load tab actions, and Mirror Settings (under Edit). |
| Tab bar | Switch between picker layouts. Each tab is independent. |
| Canvas | The button layout area. Scroll to zoom, middle-mouse drag to pan. |
| Rig menu | Dropdown to select which rig the picker operates on. |
| Lock button | Padlock icon. Prevents accidental edits in select mode. |
| Animate tool toggle |  icon in the top-right. Shows or hides the animation tools bar. State is remembered across sessions. icon in the top-right. Shows or hides the animation tools bar. State is remembered across sessions. |
| Animation tools bar | Row of buttons at the bottom of the panel: Mirror Pose, Mirror COG, Mirror Keys, Mirror Keys COG, Key, and Del Key. See Animation Tools. |
| Zone HUD | Row of colored squares — one per zone. Visible when zones exist. |
Tabs
Create a tab — click the + button in the tab bar.
Rename a tab — double-click the tab name, or use the Rename field in the edit panel.
Delete a tab — right-click the tab → Delete Tab.
Reorder tabs — drag and drop.
Lock Mode
The padlock icon in the top-right corner toggles lock mode.
When locked, entering edit mode and reassigning controls is disabled. Selection, pose, and script buttons all work normally.
Useful when animating — prevents accidental layout changes.
Quick Start
A first picker from scratch in under a minute.
- Open the panel — create a new pane tab, search for MK_APEX_Anim_Picker
- Rename it — double-click the tab name, type a name, press Enter
- Enter Edit Mode — click the pencil icon top-right
- Add a button — right-click the canvas and choose Edit Controls
- Assign a controller — in the APEX viewport select a control, click Add Selected in the popup, then close it
- Exit Edit Mode — click the pencil icon again
- Test it — click the button, the control gets selected in the viewport
- Save — File → Save Tab, choose a location for your
.jsonfile
That's the core loop. From here see Edit Mode to build out a full layout, or Pose Mode to start capturing poses.